Kijk op het fotografisch universum door Erwin Puts
Blog
  • © 2005-2020 Erwin Puts Contact Me 0

Blog

June 2019

Developer review


There are now many reviews of film-developer combinations on the internet. Most of them are quite subjective and hardly worth the reading time. The often used format is simple: use a film-developer combination and take a range of pictures of different subjects under different conditions. Then use the eye to look at the results and use the emotion to guide you.
This is not the way to present information about film-developer combinations that a reader an use. The classical approach is also quite simple: take pictures of a grey card with a range of exposures to create a series of negatives with different densities and use a densitometer to measure this density. Then use a test chart to measure the resolution and sharpness under a microscope with sufficient enlargement.
This is what I did:
Use one film, the best on the market (Ilford 100Delta), a grey card and the Tirion test chart.
On my camera I had a lens of excellent quality, stopped down to f/5.6. The first remark is that even with this aperture, you need to be careful to get the best results. The microscope had enlargements of 40x and 100x. The maximum common enlargement is 15x to 20x.
The developers used in this test are:
1. FX39-II: the classical high acutance developer, formulated by the late Geoffrey Crawley and now made by Adox. This is one of the best developers on the market.
2. Adonal: also made by Adox and a reformulation of the classical Rodinal.
3. Pyro 48: made by Moersch Chemie, a new version of the classical pyro developer
4. Super Grain: a new version of the AM74.
5. The Df96 monobath, made by Cinestill. This is an interesting developer, because it combines developer, and fixer solutions in one. You need only one development time for all films. The classic formula has very fine grain but less sharpness. It is interesting to see how the modern remake functions.
The film was exposed at the nominal speed (ISO100), the light was measured with the Sekonic Speedmaster with the incident method. camera was Leica M7 with Summilux-M 1.4/50 ASPH.
The development data are:
1. FX39-II: dilution: 1+9; temperature 20 degrees; 7 minutes; continuous: first 30 seconds, then 2x per minute
2. Adonal: dilution: 1+25; temperature 20 degrees; 9 minutes; continuous: first 1 minute, then 30 seconds per minute
3. Pyro 48: dilution:2.5 + 5 + 250; temperature 20 degrees; 16 minutes; continuous: first 1 minute, then 2x per minute
4. Supergrain: dilution: 1+9; temperature 20 degrees; 6 minutes; continuous: first30 seconds, then 2x per 30 seconds
5. Df96: stock solution; temperature 22 degrees; 6 +4 minutes (to clear the negatives); moderate agitation: 2x per minute

Results: tonal range.

The density range gives information about the effective speed, the maximum useable density for the highlights and the steepness of the curve says something about the subtleties of the tonal differences: a steep curve is an indication that the mid tones are very well separated and a less steep curve tells you that the tonal differences are well recorded but more difficult to observe.
The graph below gives all the details.


curves-developer
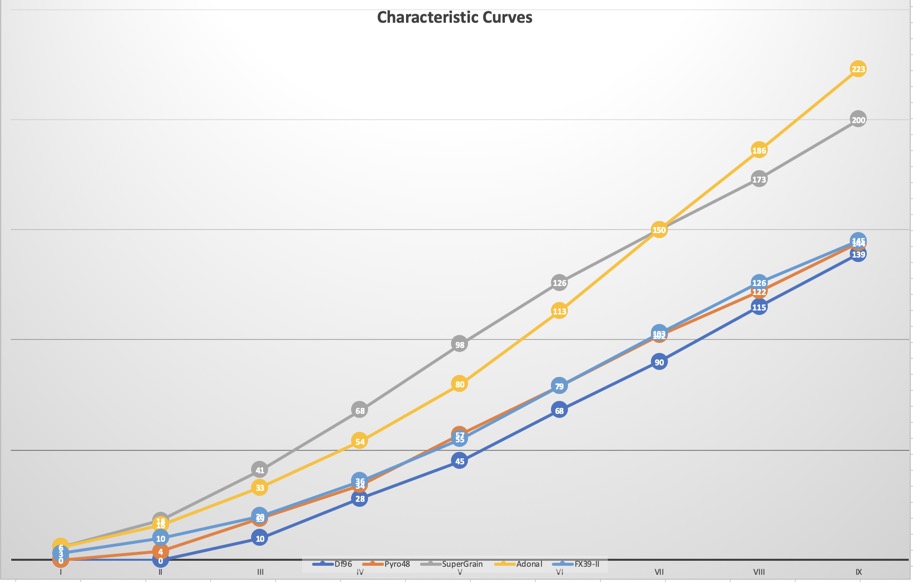
There are in fact three groups: The first group comprises Adonal and SuperGrain: The tonal differences in the extreme highlights will be difficult or impossible to print, but the shadow areas are very well recorded with good local contrast. In practice the speed of the film is fully exploited, but the dilutions could be higher (Adonal: 1+50/100 and SG 1+15 of even 1+20) with proportional increase of the development time. A reduction of development time is advisable to reduce the densities of the highlights. Some experimentation is a rewarding exercise!
The second group combines the FX39-II and the Pyro 48. Both developers score very well on tonal range and highlight density, producing subtle tonal shades with high overall contrast. Nine stops is a good score that matches the claimed tonal range of most digital cameras. For best shadow recordings, the speed should be reduced by one third (FX39) or even half a stop (Pyro).
The third group is populated by only one developer: the monobath developer by Cinestill. It has a very convenient processing cycle: no stop bath and no fixer. The high lights are well recorded, and matches the second group. Disappointing is the steep drop in the shadow area. After two stops of underexposure there is nothing to record. Deep shadows will be completely black without any trace of subject contours.The solution to reduce speed will help and the instruction leaflet says that pull processing is possible. My recommendation: set ISO speed to 50 and use the 6 minute development time. This developer is best used when deep shadows are absent in the scene.
The score (speed and tonal range) is
1 FX39-II
2 Pyro 48
3 SuperGrain
4 Adonal
5 Df96
Note that the numbers 3 and 4 could get a better score after some experimentation with speed setting and development time.

Results: grain and definition


tirion-chart

The test chart has a number of intriguing details: it shows fine print in several sizes and printing is white on black and black on white. The chart is arranged as a range of pie charts, numbered 1 to 8. (1 is op top). The white on black print is more difficult to observe because the large area of black grains will sill over into the thin white lines of the fine print.
The grain is quite pronounced with Adonal (as expected) and hardly visible with Df96 (not expected, but assumed because of the large amount of sulphite). Between these two, the grain pattern is similar for the three others. The score is:

1 Df96
2 Pyro 48
3 FX39-II
4 SuperGrain
5 Adonal

The fine print that is just readable is the limit for the resolution:
here the score is
1 FX39-II
2 Pyro 48
3 Df96
4 SuperGrain
5 Adonal

General conclusion
Overall there is not much to choose between the five developers. It is also a tribute for the Ilford emulsion. There is a old statement that says that the main characteristics are fixed by the emulsion and all that the developer can do is adjust the balance between grain, tonal range and definition a bit. This test indicates the truth of this statement. There are more considerations today to look at: Adonal is quite flexible and has a long shelf life. It produces excellent sharpness with a pronounced grain, but can be used with every film and te shape of the curve can be influenced to a high degree. It is also very cheap.
The Df96 is also quite flexible, can be used with all films and has quite simple instructions, a long shelf life, but one litre is limited to 16 rolls of 135 film. The shadow recording is non existent, but when this is not a problem, the developer is very easy to use and you need no fixing solution.
The SuperGrain functions like an improved version of Rodinal: it gives very sharp results with moderate grain and a very fine tonal range. Most films require only one development time and one dilution.
The Pyro and FX39 are the best for the recording of extremely fine detail. Grain is fine and tonal range is well within the grade 2 of the print range in Splitgrade/Multigrade. The FX39 gives very clean negatives, where the Pyro has its staining effect. The only problem with Pyro is its restricted range of films that match this developer.
My choice then is for this Ilford film: FX39-II. It has excellent definition, fine gran and a long tonal range with good shadow details and subtle highlights.
Note: with the exception of the characteristic curves, all results were observed under the microscope with 40x enlargement. Scatter in the enlarger will reduce the final results and then Adonal and SuperGrain, because of the specific grain size and distribution may hold details to a larger degree. In fact, you can not make a wrong choice with any of these developers. Fine tuning the exposure method in combination with experiments with the development times, temperature and agitation method will improve the results. Any person has its own requirements and visual standards, but the results presented here should provide a good starting point.

Linear or nonlinear?


This question might surprise you. But there are good arguments to discuss this mathematical concept in the photographic environment. Assume you have a 24 Megapixel sensor, like the one in the current M series. The image quality (a very elusive concept) should be replaced by the information capacity, but for now it are the Image Engineering calculations that dominate the discussion. The Image Engineering analysis of the sensor performance (always including a lens) has a good correlation with perceived image quality. The German magazine Color Foto is a true believer of this software. The recent issue has a report of the Leica M10-D. The results are, for ISO100, 1931 line pairs per image height (LP/IH). One would assume that when doubling the number of pixels on the sensor, the lp/im would also double. This is the linear aproach: when x=y the 2x would be 2y. As it happens, there is also a report of the Nikon Z7 with 45.7 Megapixels. Almost twice the amount of the pixels on the Leica sensor. The result? At ISO 100 it is 2822 lp/ih. The Z6 (with 24.5 Mp) has 1988 lp/ih. The lenses used are different of course. This might have some influence, as is the selection of the JPG format. The results of the Z7 are intriguing. There is a 90% difference between the pixel amount of the Leica M10 compared to the pixel amount of the Z7, but only a 46% increase in resolution. A non-linear result! So a roughly 2 times the amount of pixels results in only 1.5 times resolution.
Another comparison: the Leica has pixel pitch of 6 micron, the Z6 of 5.9 and the Z7 of 4.3 micron. The APS-C sensor of the Ricoh GR III has a pixel pitch of 3.9 micron with an APS-C sensor of 24 Mp and a resolution of 2075 lp/ih. Presumably the pixel size is more important than the sensor size. The Leica M8 is a living proof for this argument!
If and when Leica will decide on an increase of the amount of pixel for the next generation of the M camera it will be somewhere between the 24 Mp of the current model and the ±65 Mp of the Leica S models. Not being in the position to being allowed to compete with the SL in future versions (let us assume 45 Mp) the final amount would be somewhere between 24 and 45: 34.5, which happens to be neatly between both extremes. Then the increase in amount of pixels will be ±40%. The predicted increase in resolution will be around 0.5*40% and 0.75 * 40% = between ± 20 and ±30% or 1900 *1.25 = 2375 lp/ih, not the result to be really happy with. Assuming the usual tolerance of 5% for the bandwidth of the measured results, these figures only give the direction of thinking. The exact values are less important.
The same argument can be found in the discussion about film emulsions that can record 200 lp/mm and film emulsions that can ‘only’ record 80 lp/mm. With 80 lp/mm almost every detail, that is visually relevant in a scene, can be captured. But the price for the higher resolution is slow speed, careful focusing and the use of a tripod. In handheld shooting, the increase in resolution can not be exploited. Again, assuming that the M camera will be the champion of handheld snapshot style of photography, the current level of resolution that is supported by the sensor is more than adequate for the task. Leica could improve the imaging chain and especially the demosaicing section for enhanced clarity and best results.
UPDATE June 10: There is some confusion here:
Let us first get the basic figures about the measurements, based on the IE software, related to the fixed ISO 100
Ricoh GR-III: 24 Mp and 2075 lp/ih (pixel pitch 3.9 micron)
Leica M10-D: 24 MP and 1911 lp/ih (pixel pitch 6 micron)
Nikon Z6: 24 Mp and 1988 lp/ih (pixel pitch 5.9 micron)
Nikon Z7: 46 MP and 2822 lp/ih (pixel pitch 4.3 micron)
It is universally assumed that in order to double the resolution, one needs a four times increase in area: to double the resolution of the Leica sensor (24 Mp) one needs a sensor size of 4 * 24 = 96 Mp. This increase in size would (theoretically!) elevate the resolution from 1900 to 3800 lp/ih.
The Nikon Z7, which has only twice the area of the Leica sensor and therefore its resolution would be less: it is in fact 2800 lp/ih. The sensor of the Ricoh with 24 Mp has 2075 lp/ih with a comparable pixel pitch. This is important to note, because the Nyquist limit is related to the pixel pitch. For a pixel pitch of 4 micron, the Nyquist frequency is 0.008 mm per mm (or cycle) = 125 lp per mm. (application of the Kell factor of 0.7 gives 87.5 lp per mm). 2000 lp/ih is 64 lp/mm for a 15.6 mm image height. So there is some room for improvement, at least theoretically. The pixel size of 6 micron for the Leica would produce 0.012 lp per mm or 83,3 lp per mm. The 1900 lp are for the image height of 24 mm, which is 79 lp/mm. Including the Kell factor which says that you can only reliably resolve 70% of the Nyquist frequency, the practical resolution limit of the Leica sensor would be .7* 83 = 58 lp for every mm. The Leica imaging chain is better than that of the Ricoh! Or one could also claim that the JPG demosaicing of the Leica is more aggressive and that spurious resolution is spoiling the results.
The Nikon Z7 with its 4 micron pixel pitch would be able to resolve 0.7*125 lp/mm = 87.5 lp per mm. The image height is 24 mm and the resolution is 2800 lp/ih. This would result in 117 lp per mm compared to a Nyquist frequency of 125 lp per mm. Compare the measured resolution with the calculated Nyquist limit and the Kell factor:
Leica M10-D: 79 lp/mm; 83.3 lp/mm; 58 lp/mm
Nikon Z7: 117 lp/mm; 125 lp/mm; 87.5 lp/mm
The measured resolution is quite close to the Nyquist number. This is not surprising because the IE software uses the Nyquist calculation as the limiting factor in their calculations. This limiting value would result at the point where the contrast is almost zero. Not very useful! The Kell factor is used because there is a contrast level below which there is no visual difference between two adjacent lines. A contrast difference of 15% is the minimum and the Kell factor is in many cases too conservative.

Now the calculation. Doubling the size (from 24 Mp to 46 Mp) produces an increase in resolution of 1900 lp/ih to 2800 lp/ih. That is an increase of 47% or a factor of about 1.5. This is indeed a one-dimensional relation. It compares only one direction and not the area. But here is the confusion. The resolution is measured one dimensional in line pairs per mm. This resolution is identical in the horizontal and the vertical direction.The pixel pitch is a square measure (the 6 micron length of the Leica are the same for both directions. The pixel has a square area!) Now an example: assume that we would like to have the resolution of the Z7 for a new Leica sensor. Going from 1900 to 2800 lp per mm and increasing the resolution in both directions would require that the amount of pixels for the same size of the sensor grows2800/1900*24 = 35.4 Mp to get the same resolution of 2800 lp/ih. This value is less than expected. But the Leica processing chain might be more effective. The 35 Mp number would require a pixel pitch of 4.1 micron. This would result in a Nyquist value of 122 lp/mm or 2920 lp/ih. If we require to double the resolution of 1900 lp per mm, we would need a decrease in pixel pitch from 6 to 3 micron to get a resolution of 166.7 lp per mm. (Nyquist limit). This would imply an increase in amount of pixels to 96 Mp or 4 times the actual Mp or 24 Mp.
Mixing the concept of the number of pixels in a certain area and the concept of the resolution of the pixel itself (in a one dimensional line) may be the reason for much confusion. The Nyquist frequency is a one dimensional measure, assuming a square sized pixel, and will calculate the resolution of the system. The resulting pixel pitch will define the number of pixels per sensor area.

Handheld external exposure meters


NOTE: to keep this report as short as possible I have chosen not to illustrate all meters. There is enough info on the internet to get a view of any of these meters.

The following list of exposure meters has been evaluated.

______________________________
Weston Master V, 1963 - 1972
Sekonic L-398A Studio de Luxe III, 1978 - current
Minolta Flashmeter VI, 2003, later known as Kenko KFM-2100
Sekonic L-478D with 5° attachment, 2012 - current
Sekonic L-758D, 2001 - 2017
Sekonic L-858D, 2017(?) -current
Gossen Lunasix 3, 1966 - 1980 (Lunasix 3s)
Gossen Mastersix, 1983 - 1990
Gossen Starlite 2, 2001(Starlite) - current
Gossen Digisky, 2011 - current
____________________________

This list spans a period from 1950 to 2020. Handheld external exposure meters were required when mechanical cameras were made without a meter. At first exposure meters were considered a toy, not worthy of the true photographic craftsman who could estimate the intensity of the scene illumination by experience or used one of the many tables to ‘calculate’ the exposure values. Using an exposure meter slowed down the speed of taking pictures. It has been said of Cartier-Bresson that he could guess the exposure values (aperture and speed combinations) quite accurately. Never mind that his darkroom assistants had to cope with severe under and over exposed negatives. The other method is also true: C-B knew what his film could handle and by experience took only pictures when the ambient light fell within the latitude of his pre-set values. Two problems however had to be confronted: cope with the contrast range within a scene and the fact that the film reacted differently to intensity of the brightness areas. The classical examples are the black cat in a dark barn and the white bear in a snowy landscape. The thick two-layer emulsions of those days could handle a wide contrast range and also over- and underexposure. Experience taught the photographer to underexpose when confronted with a dark scene and to overexpose when the scene was brighter than the average one.
The problem of accurate exposure became more pressing when the miniature format gained popularity. The quality of the print depended heavily on the exposure: over- and underexposure will reduce the resolution and the tiny areas of tonal differences are more difficult to reproduce in print.
With the incorporation of through-the-lens exposure metering in so-called professional cameras, like the Konica Autoreflex-T, introduced in 1968. This particular model was designed for the professional market with its TTL metering and fully automatic exposure control, setting the norm for all professional cameras since. The lenses for the Konica model were also particularly good, optically, and suitable for professional tasks, but were overshadowed by the more popular Nikon and Canon ranges and the mythical Zeiss and Leitz ranges.
The last film-cartridge loading camera models used extremely sophisticated exposure algorithms, based on the analysis of thousands of film rolls and typical and a-typical scenes. When Nikon introduced its matrix exposure system, and Canon used its multi-segmented metering areas system, the technical integration of versatile metering, the classical hand held exposure meter faced extinction! The fatal blow for this instrument came when the solid-state sensor replaced the film emulsion. Now every pixel could become an exposure meter. The idea of combining focus points with exposure points was the next step.
Whatever the sophistication, the evaluation of the luminance values of every pixel resulted in one specific EV (exposure value). The algorithm how the software weighs and averages the individual values is unknown. The user is hardly interested, because the selected EV is almost always accurate and at least sufficient as a base for subsequent post processing. The cursory look at the histogram is not a real alternative for the function of the program, because the histogram only shows the distribution of the brightness values over the range of 0 to 255. It does not tell you which parts of the scene have which values. And it is still left to the photographer to decide what parts of the scene are important and what is the best exposure for these parts.
One of the best implementations of TTL exposure measurement can be found in the famous Olympus OM-3 and OM-4. There is a spot meter option, coupled to a high and dark selection. Use the spot to aim at a bright spot and the high option will increase EV by two stops, ensuring that this area is at the top of the characteristic curve. For the dark areas the opposite rule applies. It is a crude, but effective approximation of the Zone System. The only caveat is the fact that the spot diameter changes with the used focal length. This is a problem with all so-called narrow angle meters in a camera body. One of the advantages of the handheld spot meter is the consistency of the one degree spot. Whatever you aim at to measure, it is always a one degree measurement.
Here we have one of the advantages why it makes sense to use an external exposure meter: the spot meter option. Measuring several different brightness areas in the scene and averaging these gives a good idea of the final EV. The second advantage is the option of incident metering. Much has been written about this technique. The idea is simple: the illuminance of a scene depends on the brightness of the main source. Measuring this source is the only thing that matters. The various reflectance values of the parts of the scene are not relevant. With a sun high in the sky it makes no difference if we take a picture of a white or a dark wall. The EV is identical. Incident measurements were the favorite of many Directors of Photography on film sets. It is easy to measure the main and the secondary light sources and balance both. The Sekonic Studio de Luxe is the latest version of such a meter. It has limited sensitivity (only 4 EV at ISO100). It is a battery-less meter, a great companion for the battery-less mechanical cameras (as example: the Leica M3, Leica M-A, the Nikon F and the Canon Rangefinders).
The main advantage of this meter is the simple operation, combined with a maximum of information. The large dial shows at one glance all combinations of aperture and speed for still photography and cine, ISO settings and EV values. Under- and overexposure values by one and two stops can be easily selected. In fact this dial tells you everything you really need to know about correctly exposing a scene. The method of measuring reflected light is supported, but can not be recommended.

The other meter of this type is the Weston Master, here in its final version (V). The Weston Master V is a more modern version of the original Weston Master I, made in England from 1947. The Westons are famous for their accuracy and the special shape of the Invercone dome, converting the meter into an incident-type instrument. The shape of the dome gives accurate EVs even when the main subject is backlighted. The dial presents the user with a number of controls: in addition to the ones on the Sekonic meter, there is a brightness range scale and a method for reading extremely low light and extremely high light areas. Reflected readings are also quite easy and deliver accurate results.

The evolution of the exposure meter shows an increasing tendency to flash metering and radio control of external flash units. The parallel trend is to more sensitivity, flexibility and versatility.
More sensitivity and the simplicity of the traditional scales is the strong point of the Gossen Lunasix. Its range is now extended to -4 EV, a level almost matched by the new Sekonic L-858.
The Lunasix was a purely photographic meter. Gossen produced the next generation of meters, taking advantage of then new electric circuits and micro-processor. The Mastersix was a very versatile meter with additional accessories for specialized applications. It could master all photographic tasks and also the basic photometric tasks. It has the same sensitivity as the Lunasix (-4EV) and can be used as a scientific instrument.
Its size is a limitation and the latest addition to the Gossen range, the Digisky, is more compact. (size of the Mastersix: 70 x 130 x 34 mm versus Digisky: 60 x 139 x 16). The sensitivity has been reduced to -2.5 EV. This level is still enough for most scenes. The meter compensates this with an extended range of features, like flash readings, mixed readings for flash plus ambient light and most importantly a range of options for the cinematographer. A color display supports the analysis of the main values. The meter lacks a spot option. If this is important the Gossen range has the Starlite 2.
This meter incorporates all measurements of the Mastersix and adds the unique option of the Zone System readings. Dip switches are needed to change between function groups. The meter is very sensitive and it takes some time to get stabilized readings. The versatility for cine and photometric measurements is a bit too much for most users, but when needed everything is there, including a range of flash readings.
The layout is ergonomic, but the dip switches ask for some pre-configuration to get the optimum one-hand operation.
The change from incident light to reflected light via spot meter is done by turning a ring on the measurement unit. This is a bit inconvenient and the Minolta Flashmeter VI has a better solution. Changing between the two modes is easy. The meter is sensitive to -2EV (spot is only 2EV) and has separate buttons for Average, Highlight and Shadow readings. The range can be adjusted in the Custom Settings. Standard it is -3 stops for Shadow reading and + 2, 5 stops for Highlight readings. The latitude function shows the latitude of the preferred film emulsion and indicates when the measured subject contrast range is inside or outside the specified latitude. The Custom Functions are quite flexible and must be the maximum that an analogue meter can handle.
The Sekonic L-758D was announced in 2001. It is a unit optimized fro still photography with digital cameras. There is a wired connection with a computer to set the specific latitude for the sensor response for the minimum and maximum light levels that the sensor can handle. The cine and photometric values had to be omitted and a specific version L-758C was introduced for movie requirements. The basic L-758D has a flexible way of combining readings from ambient(spot and incident) and flash light. These modes require study and insight into what is happening at the scene. This requirement is indeed one of the main reasons to use a separate handheld meter. Using a meter gives insight into what is involved in the simple final exposure value. The camera may respond with a specific f-number and shutter speed, but there is no information why the camera has selected these parameters.
The L-758 can measure low light levels to -2EV (spot 1EV), can calculate and change the ratio of flash and ambient light readings and can do averaging readings and light contrast analysis.
During the first decades of the twenty-first century color LCD and touch-sceens became the rule for smart phones and cameras. Sekonic and Gossen went back to the drawing board and came back with the L-478D and the Digisky.
The L-478D has a sensitivity of -2 EV with the Lumisphere (reflected light with separate attachment 3EV) and incorporates all functions of the L-758D and C (but without the spot meter facility. The separate attachment (for five degree measurement) is cumbersome and not really a fine addition. For ambient (incident) light readings, flash metering and analysis and personalized display settings for still photography and cinema, the instrument is quite unique. There is one problem with all these flash meters and that is the measurement of high speed flash (stroboscopic and non-studio flash). Studio flash is rather slow and most meters can catch the peak of the flash energy. On-camera and in-camera flash has a very short duration and this cannot be measured by standard flash meters.
The recent L858 does away with this critique. It combines the touch screen of the L-478 with the options found on the L-758D/C and extends even on the software flexibility. There are no longer buttons on the instrument and everything is changed with the options on the touch screen. This is both flexible and slow: instead of just pressing a button, you now have to wait through a menu of options to find the one you need. The sensitivity has been enhanced to -5EV for incident readings and -1EV for the spot meter. The ability to measure HSS flash peak values and flash duration is a bonus for those photographers who use flash for freezing movement, but will be of limited use for the available light photographer who needs to measure dimly-lit scenes.

The measurements for comparison
All measurements were done in a diffusely lit room with all meters (in incident mode) pointing in the same direction. Spot metering was done in the same room with the target a grey card, made by Fotowand. ISO setting is 100.
Below are are the results in EV:
Weston Master V (Invercone)……………………………………..9.7
Sekonic L-398A Studio de Luxe III (Lumisphere)……………..10.3
Minolta Flashmeter VI
incident…………………………………………………………… 10.3
spot 1 degree………………………………………………………10.5
Sekonic L-478D
incident…………………………………………………………… 10.4
spot 5 degree………………………………………………………10.5
Sekonic L-758D
incident……………………………………………………………10.7
spot 1 degree……………………………………………………10.8
Sekonic L-858D
incident……………………………………………………………10.5
spot 1 degree……………………………………………………10.6
Gossen Lunasix 3
incident …………………………………………………………10.0
reflected…………………………………………………………..10.5
Gossen Mastersix
incident ……………………………………………………………10.2
reflected……………………………………………………………10.5
Gossen Starlite 2
incident……………………………………………………………10.4
spot 1 degree……………………………………………………10.8
Gossen Digisky
incident ……………………………………………………………10.0
reflected……………………………………………………………10.5
Note: The EV values for the incident and spot meter modes are not comparable, because they are generated in different conditions. The target for the spot readings is the grey card. This method is good for comparing the calibration of the meter.

Between the reading of the Weston master and the Sekonic L-758D there is a difference of one stop. This is partly due to the different method of calibration. Every meter needs to be calibrated in relation to a known light source. In addition there is also the design philosophy of where the average reading should be placed on the characteristic curve. The Weston Master clearly assumes that a slight over exposure (black and white film) is good for the shadow detail in the scene. The Sekonic on the other hand assumes that slight under exposure is the best solution (it is for slide film and general sensor capture). The Sekonic can be individually calibrated, so the choice is of secondary importance. All other meters are within a third or half stop difference. Hardly important for the average black and white or colour negative film. This difference is only significant when working at the extreme ends of the film or sensor latitude.

Why use a handheld exposure meter?
This question needs to be answered from several perspectives: functional, educative and fun.
Functionally the exposure meter is required when using a meterless camera (which is obvious), when a true one degree spot meter reading is needed and when there is a substantial use of flash light in ambient light scenes. It makes sense to use an external exposure meter even when the camera has a built-in TTL metering system and has a sensor. The exposure latitude of a sensor is less than commonly assumed: a spot meter is a great tool to make sure the exposure of the important areas of the scene is within the useable contrast range. An incident reading is also advisable when the scene has unusual brightness distributions. In all other cases there is no functional argument for using an external meter: the modern in-built TTL metering systems were and are remarkably efficient.
The educational role of the external meter is the most important asset of this method of exposure control: a spot meter reading of important areas in a scene and averaging these values and comparing them to the values that the camera proposes is often interesting and an inspiration for thinking. Using the Zone System or the Highlight and Shadow Buttons lets the photographer control effectively the tonal values of the scene, irrespective of this is recorded by film or by digital means.
The fun factor is the last but certainly not the least argument. Not being dependent on what the exposure algorithms inside the camera propose and making a decision oneself, based on a thorough analysis of the scene and a knowledgable prediction of the behavior of the recording medium, is fun. The technological dependency in photography is generally quite high and the exposure is too important to leave it to some program, however efficient.

What meter do I use?
I have two meters in my bag:
The Sekonic Studio de Luxe for battery independent incident readings
The Gossen Starlite 2 for spot metering, Zone System analysis and photometric analysis (this is fun and not directly related to the photographic tasks.

If only one meter is required (because of space requirements in my small Billingham Hadley bag I select the Gossen Digisky or the Minolta Flashmeter VI or the Sekonic L-858D (for its high sensitivity). The choice depends on the envisaged application (Gossen: compact; Minolta: ergonomics; Sekonic: flexibilty).
When using a classic camera (Leica M3, Canon VIL or Canon F-1), I match the meter to the camera (easy to handle Weston Master or the scientific Mastersix).
Luckily I have the choices!